
The AEM EMS is unique compared to other ECUs in the way that telemetry is not enabled to be on from the factory. Telemetry configuration is relatively complex. The following instructions details this process step by step.
To enable CAN telemetry:
- Open the program “AEM Tuner” (it can be downloaded here).
- Connect USB cable to laptop.
- Connect to ECU (ECU > Connect to ECU). Note that you may have to cycle the key to reset power to the ECU when you try to connect.
- Open CAN Telemetry Setup (Tools > Configure Telemetry > CAN Telemetry).
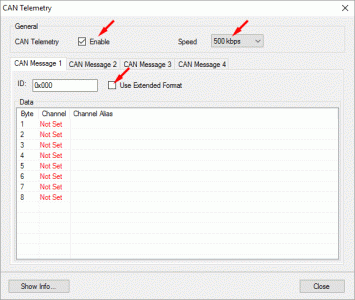
- As shown below, click “Enable”, Set the speed to 500 kbps, and leave “Use Extended Format” unchecked.
- If you are using a design other than the default design, you should first determine what channels your design uses. There are two ways to do this:1) if you are using one of gaugeART’s designs, go to the specific design you are working with in Design Gallery, and view the design’s telemetry list 2) open the design’s .GAD file in gaugeDesigner (click here for instructions on how to open designs in gaugeDesigner). The image below shows the channel list in gaugeDesigner. Click the channel name (ie. Channel 1) to highlight the gauge that channel corresponds to. The following example is for the default design.
- Next, you will enter in the specific channels used by the default gaugeART CAN Video Gauge Adapter design for the AEM Series 2 EMS. As shown in the Design Gallery, this design uses the following channels (address, byte, channel):
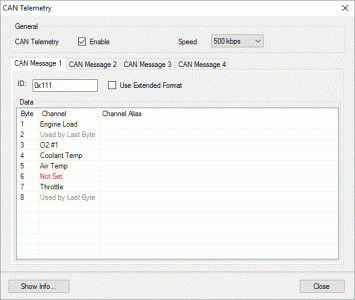
- 0x111, 1, Engine Load
- 0x111, 3, O2 #1
- 0x111, 4, Coolant Temp
- 0x111, 5, Air Temp
- 0x111, 7, Throttle
- 0x222, 1, Battery Raw
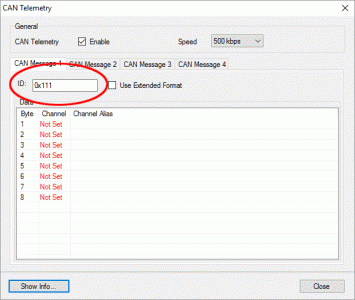
- Each “CAN Message” tab found in the screen above relates to an address. You will see that the telemetry list above includes two addresses: 0x111 and 0x222. Thus, two tabs will be used for this telemetry configuration. For the CAN Message 1 tab, set the ID to “0x111” as shown below. Click the CAN Message 2 tab and enter “0x222”.
- Click back to the CAN Message 1 tab. You will see there are 8 bytes in the left column. Click the “channel” for Byte 1 and set this to “Engine Load” then hit enter on your keyboard. Repeat for the remaining channels – clicking the byte number listed and selecting the correct channel. Click the CAN Message 2 tab, and select Battery Raw (you will find that this channel, like others, will default to another name – for this channel, it changes to ADCR08 – this is normal).
- Your setup is now complete. Turn off your ECU by switching off the ignition, and power back on. Your gaugeART should now display correct telemetry.