Read first:
Gauge Styles
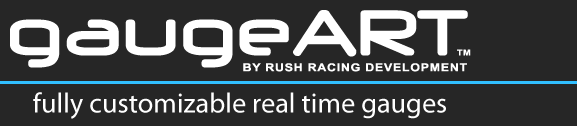
gaugeDesigner includes four types of gauge styles: digital gauges, circular gauges, horizontal and vertical bar gauges. Gauge styles are set from the channel list as shown below.
Selecting Gauges
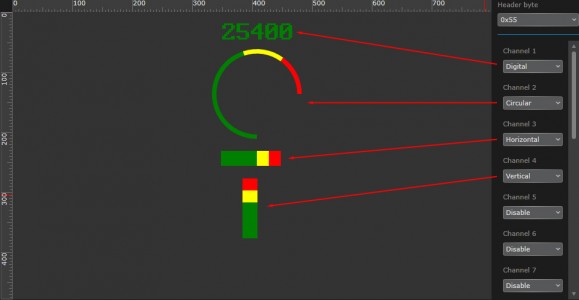
To select a gauge, click on the gauge itself, or, click the gauge number in the channel list. This will highlight the gauge that the channel clicked relates to as shown below. Note that when a gauge is selected, the settings icon for that gauge becomes active.
Positioning Gauges
There are three ways to position gauges:
- Select gauge and drag it around the design canvas. Note that a gauge can not be positioned off the canvas.
- Click the gauge and while holding the “Control” key down on your keyboard, click an arrow in the direction you want to move (this moves the gauge by one pixel) or while holding down the “Control” and “Shift” keys, click an arrow in the direction you want to move (this moves the gauge by ten pixels).
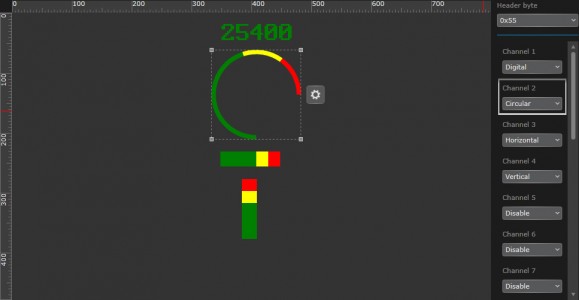
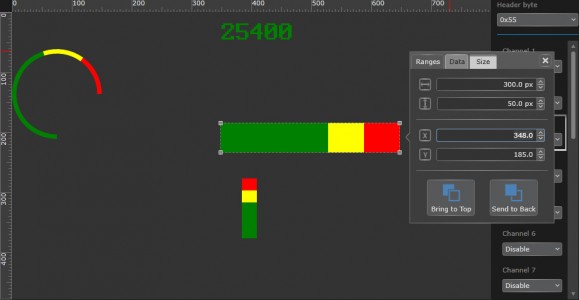
- Click the settings icon for the gauge then click the “Size” tab. Positioning of the gauge is done by changing the X (horizontal) and Y (vertical) numbers for the top left of the gauge – either by entering the numbers directly or clicking the arrows up or down. You will note that the design canvas has rulers (in pixel units) at the top and left of the canvas. As shown, setting X to 0 moves the gauge to the far left. Viewing the numbers in the settings window can help you align gauges.
Note that as you move gauges around on the canvas, horizontal or vertical lines will show when gauges are in alignment with each other. Also, note that if gauges over lap each other, simply click “Send to Back” under the “Size” tab as shown below to move the gauge behind the other gauge.
Sizing Gauges
There are two ways to size gauges:
- Make the gauge larger or smaller by dragging the corners of the gauge.
- Click the settings icon for the gauge then click the “Size” tab. Sizing of the gauge is done by changing the vertical and horizontal numbers or by directly entering numbers.
Note that a gauge can not be made larger than 400 pixels in any dimension.
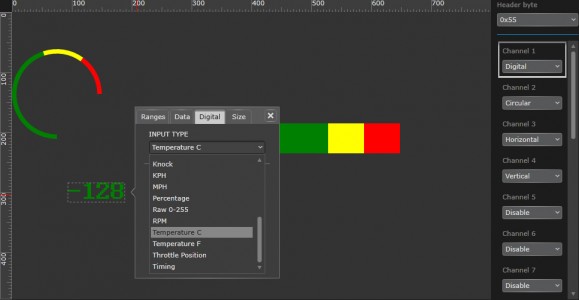
Digital Gauge Units
Digital gauge units are set by clicking the gauge settings icon, clicking the “Digital” tab, then choosing the unit you wish to display. Note that the telemetry must be configured properly for this channel to display properly. Using the example below, the telemetry output from the ECU must be configured with a temperature parameter (coolant temp or air temp) for channel 1 in the image below to display properly. You can select between “Temperature C” and “Temperature F” as shown below. Note that there is also an “AEM Temp C” and “AEM Temp F” which are only when using aftermarket temperature sensors, like the ones sold here.
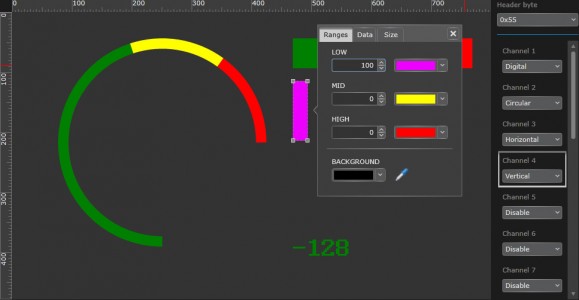
Gauge Colors
Gauges can be configured to be a solid color at all times or change colors depending on the data from the ECU. To make a gauge a solid color at all times, click the gauge settings icon and click the “Ranges” tab. Enter “100” as shown and select a color by clicking the color drop down. As you can see, the vertical gauge has been configured to be pink at all times.
Due to the complex configurable nature of the AEM EMS telemetry, configuring gauges to change colors based on the data output from the ECU is more complex than other ECUs. Please click this for advanced AEM EMS gauge configuration.