
Read first:
In this tutorial, you will learn how to make a gauge design from scratch. To begin, open the Design Gallery, select your ECU, then select the “Classic” design, add to cart, check out, and download and unzip the files to your desktop.
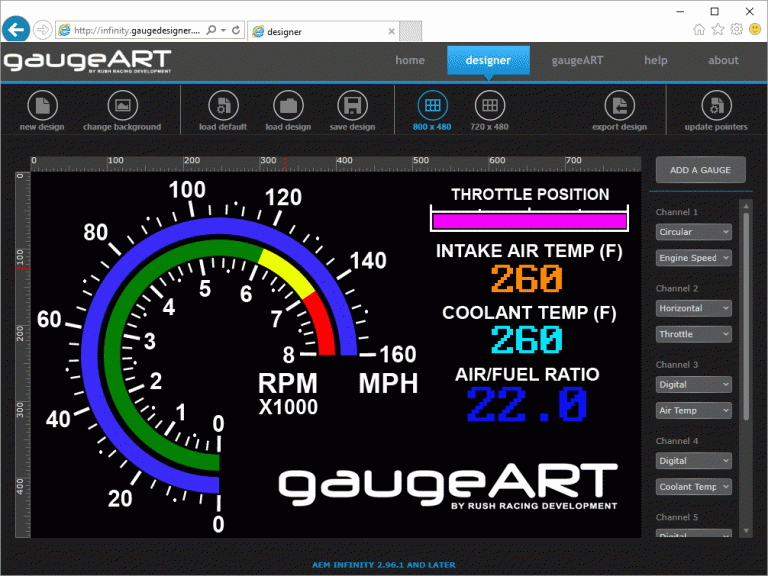
- Click “load design” and open the .GAD file. This is what your design will look like when completed.
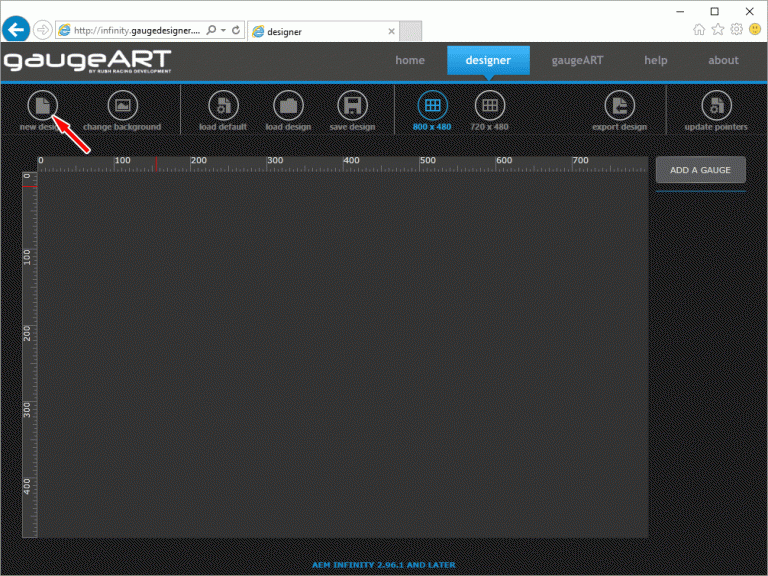
- Click “New Design” to start from scratch. When prompted, open the background image (the .JPG file in the files you downloaded).
- The right column in design is the list of gauges in the design. The first gauge we will create is engine speed. Click “ADD A GAUGE”. Select “circular” for the gauge type. Next, choose “Engine Speed” from the second drop down as shown.
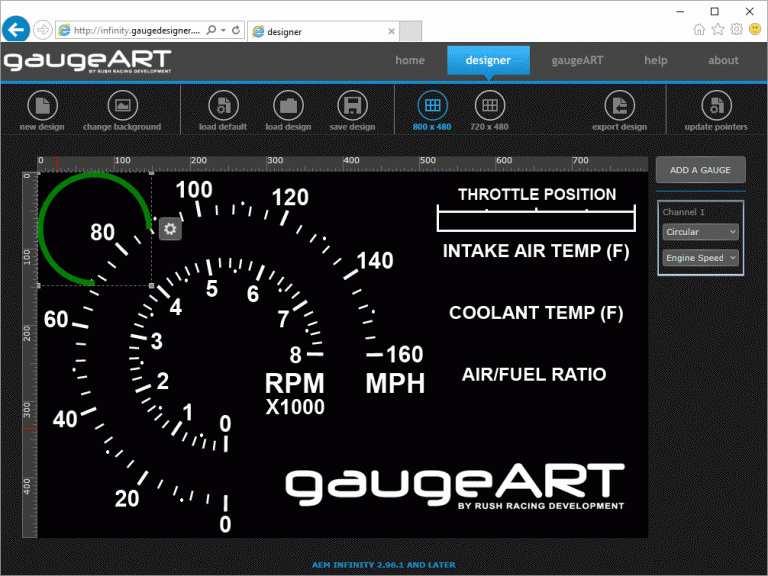
- Click the settings icon.

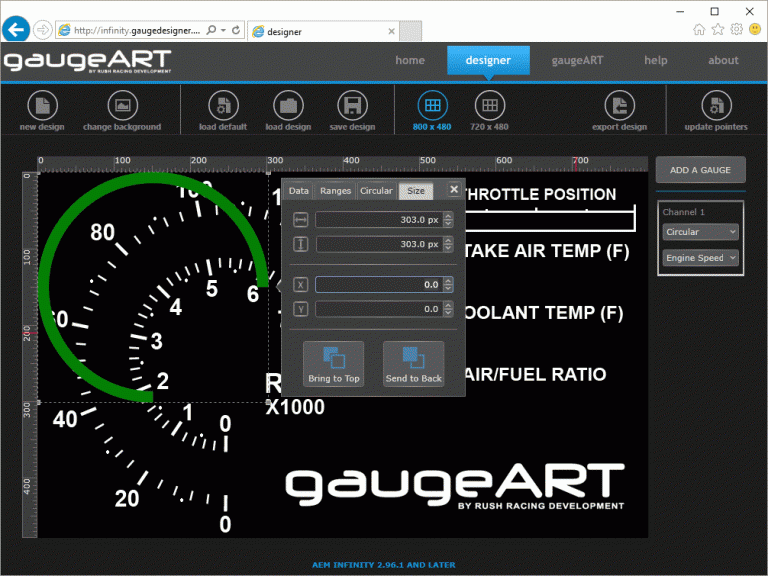
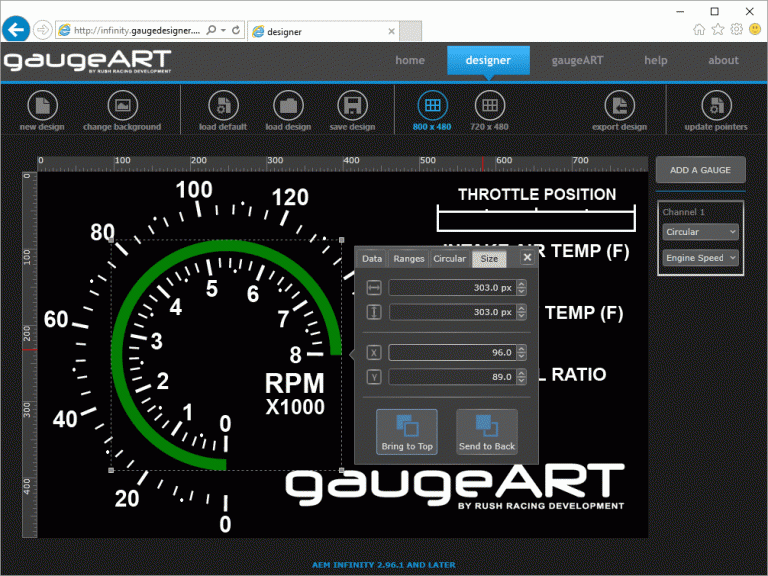
- Click the “Size” tab. Enter “303” for the horizontal and vertical width settings as shown to make the gauge the correct size. The size can also be manipulated by dragging the bottom right of the gauge.
- Try to place the gauge in place by clicking the gauge and holding your mouse button to position the gauge as shown below (the settings window will close). You can move the gauge by one pixel by clicking “control” on your keyboard and the left, right, up, or down arrow. To move the gauge by 10 pixels, click “control”, “shift” and the left, right, up or down arrow.
- Positioning can also be done in the settings “Size” tab. Click the settings icon, then the “Size” tab. Click the horizontal (x) and vertical (y) arrows up or down. The position changes by 10 pixels. Enter “96” for the horizontal and “89” for the vertical positions as shown.
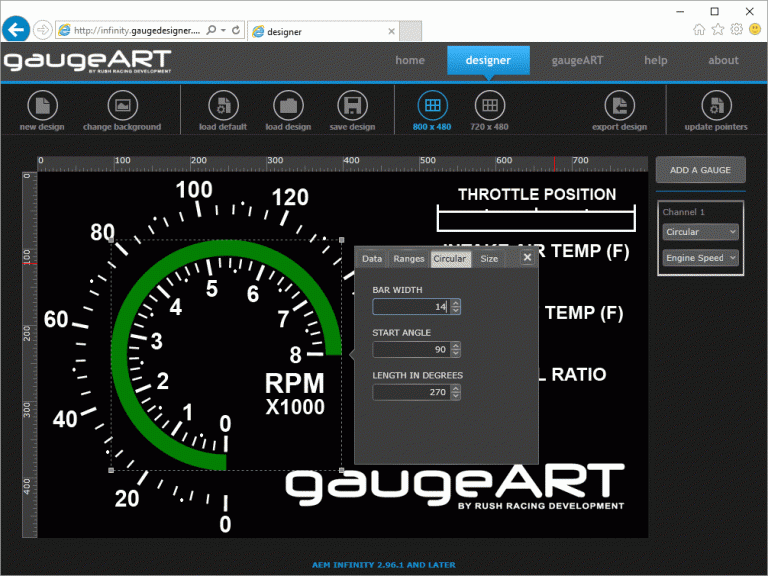
- Click the “Circular” tab. Change the bar width to “14” in order to make the gauge thicker. Click the arrows up or down for “start angle”. This refers to the degree that the circular gauge will begin. This can be changed if the background design’s ticks start at a certain angle. For this design, set start position to 90 to match the ticks in the background design. Click the arrows up or down for “length in degrees”. This refers to the length of the circular gauge in degrees. This design’s gauge spans 270 degrees, or three quarters of the gauge’s range, so set “length in degrees” to 270 to match the ticks in the background design.
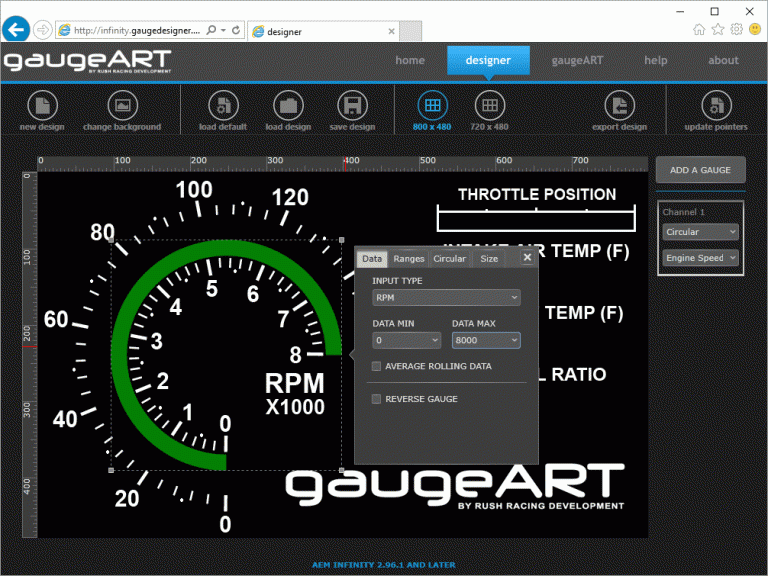
- Click the “Data” tab. The “data min” and “data max” values refer to the range of the data that will be displayed. Since the gauge design will display 0 – 8000 RPM, set the data min value to 0 and the data max value to 8,000 as shown.
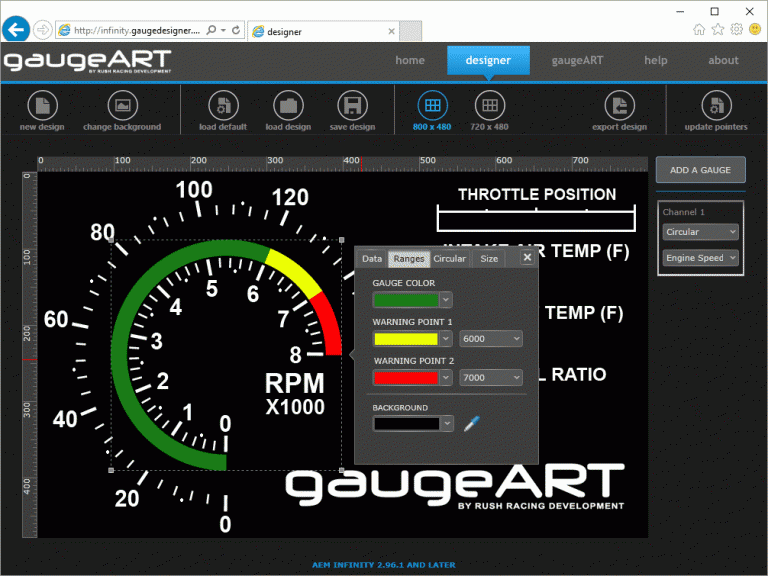
- Next, click the “Ranges” tab. First, choose the background color that the gauge is positioned over. For this gauge, the background is black, the default color. We will set the warning points of the gauge to change the gauge’s color to yellow at 6,000 and red at 7,000. To do this, click the warning point drop down for “Warning Point 1” and set it to 6000. Click the color drop down and choose yellow. Repeat the same for “Warning Point 2” to 7,000 and the color red. The result is as shown.
- The next gauge added will be throttle position. Click “ADD A GAUGE”. Select the drop down and set the gauge type to “Horizontal” and the data type to Throttle.
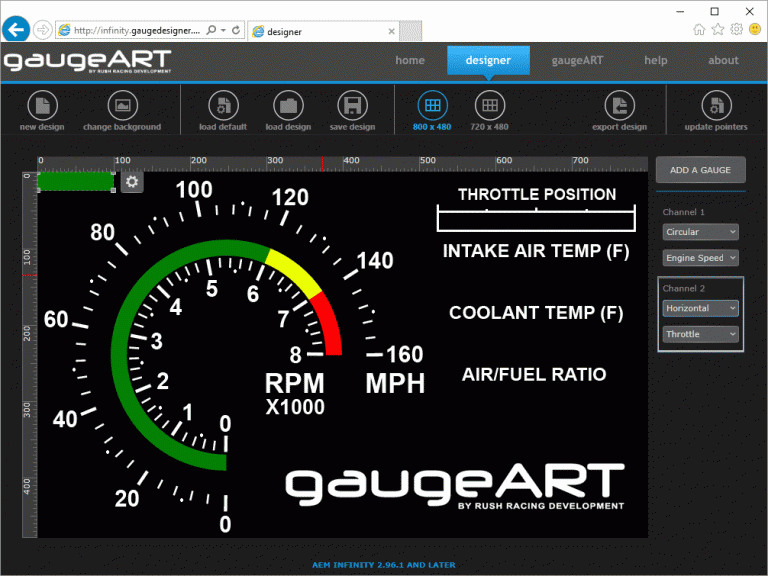
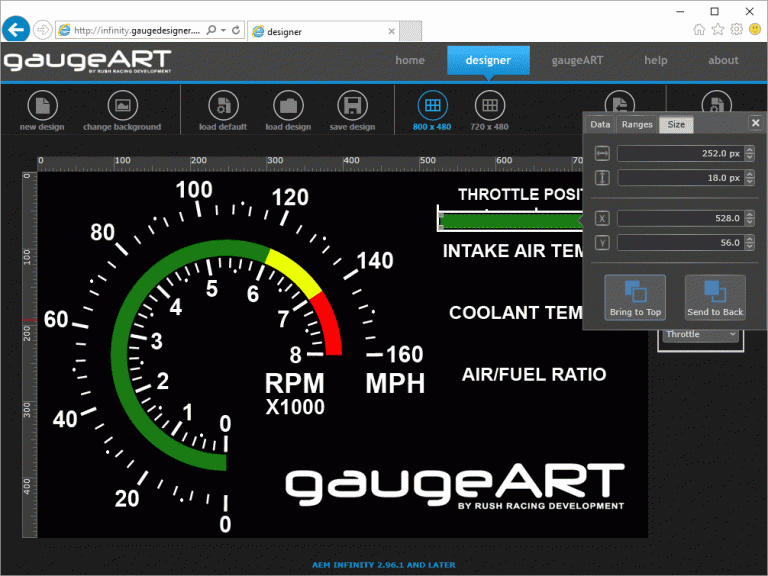
- Select the settings icon, and set the position and sizing as shown.
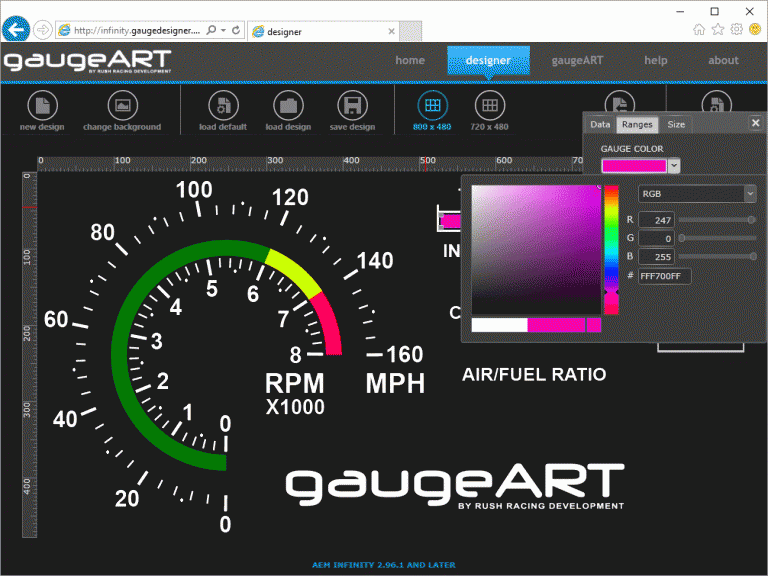
- We want this gauge to be bright pink for the full range. Colors can be entered with their color ID’s. Click gauge color and enter “FFF700FF”.
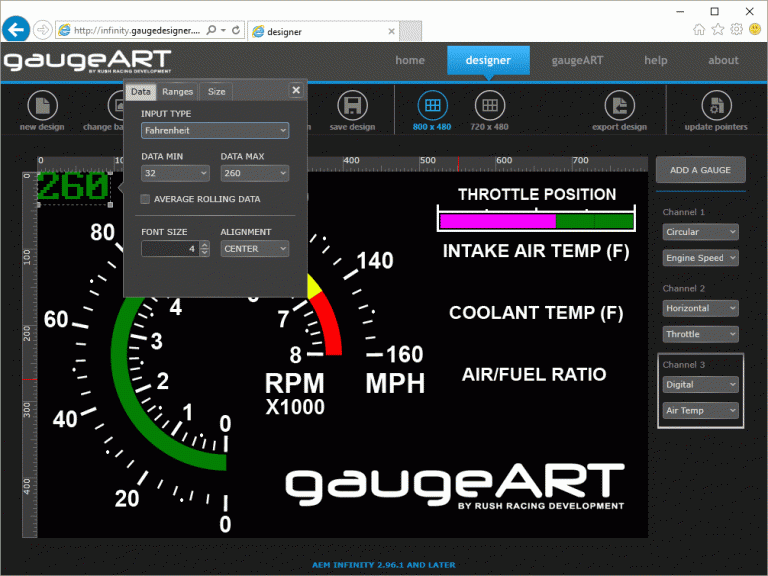
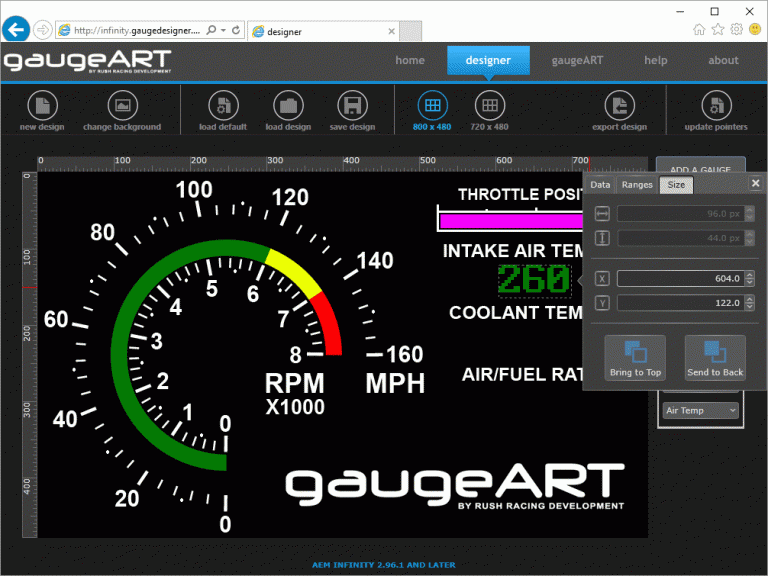
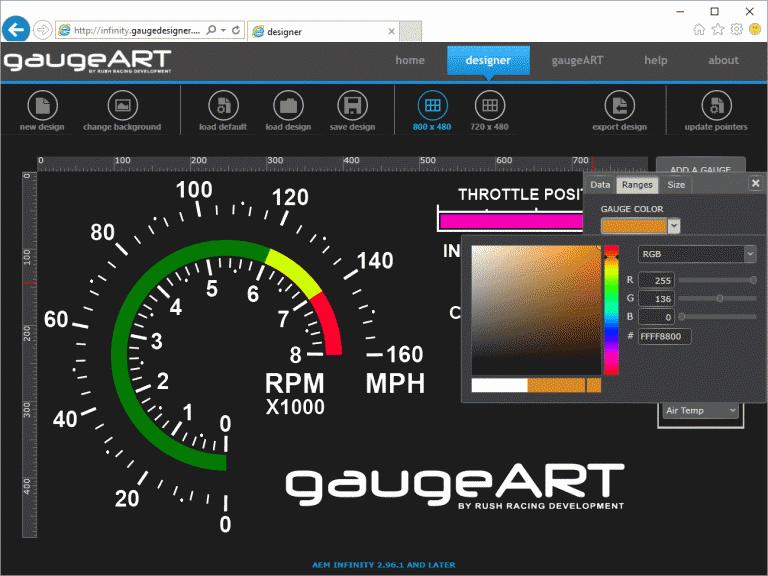
- The next gauge added will be intake air temperature. Click “ADD A GAUGE”. Select the drop down and set the gauge type to “Digital” and set the data type to Air Temp. Click the gauge settings and click the “Data” tab to set the input to Fahrenheit, the font size to 4, and select “Center” for alignment to align the text on center.
- Set the position of the gauge (604 & 122).
- Choose orange for this gauge (FFFF8800).
- Repeat the same process for the digital coolant gauge. Coolant is located at 604 & 203. The data type is “Temperature F”, the font size is the 4, and the alignment is center. The color is teal (FF01E6FC) and it is the same color for the entire range.
- Repeat the same process for digital air/fuel ratio, or O2#1 gauge. AFR is located at 573 & 282, the font size is the 5, and the alignment is center. The gauge color is blue (FF0A12F2), the first warning is yellow (FFFFFF00) at 12.8, and the second warning is red (FFFF0000) at 13.2
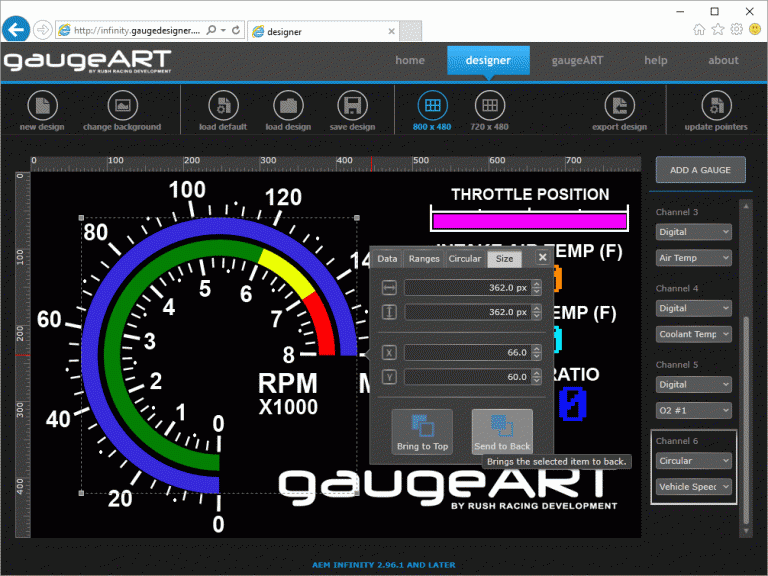
- The last gauge to be created is for vehicle speed. Click “ADD A GAUGE”, select “Circular” and “Vehicle Speed”. Position gauge as shown. This gauge has a thicker width (12) and has a starting angle of 90 and length of 270 degrees.

- When gauges over lap such as the Vehicle Speed and Engine Speed gauges, you can select the gauge that is on top and send it behind by clicking the “Size” tab then selecting “Send to Back” as shown.
- Congratulations, you have just finished your gauge design! Although you’ve already downloaded this design, let’s practice the final steps to save your design to your hard drive, then prepare the files for the gaugeART Video Gauge Adapter.
- Save your design to your hard drive by clicking “save design”. Save the file as classic.GAD on your hard drive.
- Click “new design” to create a blank canvas.
- Click “load image” to open the background image you downloaded.
- Click “load design” to open classic.GAD you previously saved.
- Next, you will export the two necessary files used by the gaugeART Video Gauge Adapter. Click “export design”, and save the file created to the microSD memory card. Lastly, if the microSD card does not already have the pointer file, click “update pointers”, and save the file created to the microSD card. Do not change any of the file names created by gaugeDesigner when saving files to the microSD card.
- Insert the microSD card in to the gaugeART Video Gauge Adapter, turn on power, and your created design will now display.

